Tagging Branches
The current list of tags for a branch is shown in the box below the
Tag Toolbar, which is located
below the Tree in the Data View. Tags
are displayed in the color assigned to the tag. Click
the plus ( ) icon on the toolbar to select a tag to add to the current branch; click the
minus (
) icon on the toolbar to select a tag to add to the current branch; click the
minus ( ) icon to select one of the branch's existing tags
to remove. When
you add a tag to a branch, every descendent of that branch will also get
the same tag. For
example, tagging South City will also tag South City\Single family, South
City\Multi family, South City\Single family\Showers, South City\Singe
family\Washing, etc. The
same is true for removing a tag -- it will also be removed from all descendents.
An exception
is for rivers -- if you add (or remove) a tag to the river's branch, such
as Weaping River or Blue River, it will NOT add (or remove) the tag to
the nodes on that river. However,
you can tag or untag multiple river nodes or reaches by clicking the category
branch, e.g., "Weaping River\Reservoirs" or "Weaping River\Reaches."
) icon to select one of the branch's existing tags
to remove. When
you add a tag to a branch, every descendent of that branch will also get
the same tag. For
example, tagging South City will also tag South City\Single family, South
City\Multi family, South City\Single family\Showers, South City\Singe
family\Washing, etc. The
same is true for removing a tag -- it will also be removed from all descendents.
An exception
is for rivers -- if you add (or remove) a tag to the river's branch, such
as Weaping River or Blue River, it will NOT add (or remove) the tag to
the nodes on that river. However,
you can tag or untag multiple river nodes or reaches by clicking the category
branch, e.g., "Weaping River\Reservoirs" or "Weaping River\Reaches."
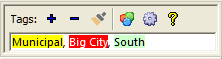
Tag Toolbar (with tags shown for Weaping River Basin's South City)
Important: Because WEAP can
use tags to group and subtotal results, do
not assign more than one tag from the same category to a branch. If
you do, you might double count the results. For
example, if you assigned tags "South" and "Central"
to Demand Site South City, both of which are in the same category (Location),
South City's results would be counted in both the South and the Central
tag results, if you chose to view results by tag. WEAP
will check for this situation and warn you in the Results View.
You can use the Tag Painter
to quickly tag several branches, by copying tags from one branch to several
others. Click
the tag painter icon ( ) to copy the tags from the current
branch, then click on each other branch for which you would like to add
those tags. To
exit tag painter mode, either click the paint brush icon again, or hit
the Escape key on your keyboard.
) to copy the tags from the current
branch, then click on each other branch for which you would like to add
those tags. To
exit tag painter mode, either click the paint brush icon again, or hit
the Escape key on your keyboard.
You can also right click on any branch in the tree and choose "Add
Branch Tag," "Remove Branch Tag," or "Tag Painter"
to use that option on the selected branch. These
options are also available on the Tags main menu.
To edit the master list of tags, click the gear icon ( ) to access the Manage Tags screen,
or the main menu option: Tags, Manage Tags...
) to access the Manage Tags screen,
or the main menu option: Tags, Manage Tags...
One way to determine which tags a branch has is to click on each branch,
and see the list below the tag toolbar. But
there is also a way to see the tags for many branches at once. If
you have chosen different colors for your tags, click the color
icon ( ) on the tag toolbar and choose a tag category. This
will cause all branches with any tag in this category to be displayed
using the color associated with that tag. For
example, in Weaping River Basin, you can color the branches by one of
the three example tag categories: Demand Type, Location, Size. Try
this to quickly see which tags each demand site has. (To
expand the tree to see all branches, right click on the tree and choose
"Expand all.")
) on the tag toolbar and choose a tag category. This
will cause all branches with any tag in this category to be displayed
using the color associated with that tag. For
example, in Weaping River Basin, you can color the branches by one of
the three example tag categories: Demand Type, Location, Size. Try
this to quickly see which tags each demand site has. (To
expand the tree to see all branches, right click on the tree and choose
"Expand all.")
The menu option Tags, Export to Excel
can be used to make a quick report of all tags on branches. This
is also an easy way to edit tags for many branches at once. Edit
the list in Excel, then choose the menu option Tags: Import
from Excel to read in the edited list. When
you Import tags from Excel, WEAP will add the tags listed in the spreadsheet
to the list of tags already existing for a branch. (And
a tag added to a branch will also be added to all the branch's descendents.)
It will
not remove any tags from a branch unless the list of tags read from Excel
is blank. In
this case, WEAP will remove all tags from the branch. You
can also use this method to create new tags -- any tag imported from Excel
that does not already exist will be created, with Color = White and Category
= Uncategorized.
See also:
Tags (Overview), Manage
Tags, Tagging on the Schematic,
Filtering, Using
Tags to Filter, Group and Subtotal Results, Scenario
Explorer, Tag API
Menu Option:
Tags