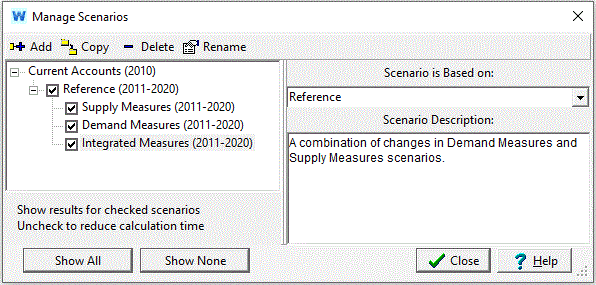
Use the Manage Scenarios screen, to create, delete, organize and set the properties of the scenarios in an Area.
The tool bar at the top of the Scenario Manager lets you add, copy, delete and rename scenarios. Click on Add () to add a new scenario, immediately under the current scenario. Click on Delete () to delete a scenario. Bear in mind that deleting a scenario will delete all data associated with that scenario, and also all scenarios that are based on it. Click on Copy () to make a copy of a scenario with a different name, and click on Rename to rename the scenario.
On the left side of the screen, the Area's scenarios are listed in a hierarchical tree showing the main scenario inheritance structure. Scenario inheritance describes how each scenario inherits the expressions from the scenarios above it in the hierarchy. For more information, refer to Scenario Inheritance. Click on a scenario in the tree to edit it or to add a new scenario beneath it.
On the right of the screen, you can edit a scenario's inheritance and description. Use the Scenario is Based on selection box to change the scenario's "parent." For those branch/variable combinations in the scenario for which no expression has been explicitly defined, a default expression is inherited from one of its ancestor scenarios. First the parent is checked for an expression. If none is found, then the parent's parent is searched. This continues until an expression is found, either in an ancestor scenario or in the Current Accounts. If no expression is found, the default expression for the variable (if any) is used.
To show or hide results for individual scenarios, check or uncheck the scenario's checkbox in the hierarchical tree. If a scenario's checkbox is unchecked, then WEAP will not calculate results for that scenario. Click "Show All" to check all scenarios; "Show None" to uncheck all.
In the example shown below, there are four scenarios defined -- a Reference scenario and three variants.

Menu Option: Area: Manage Scenarios (also on Data View toolbar)