WEAP and MODFLOW are now dynamically coupled. WEAP will pause during calculations after each time step to load information (groundwater pumping and recharge, and river stage, disaggregated to cells) into newly created, temporary MODFLOW input files, run MODFLOW for one stress period/timestep, and then retrieve results (cell heads, and flows between surface and groundwater (RIV and DRN packages), aggregating cells to river reaches and groundwater nodes) from the MODFLOW output files.
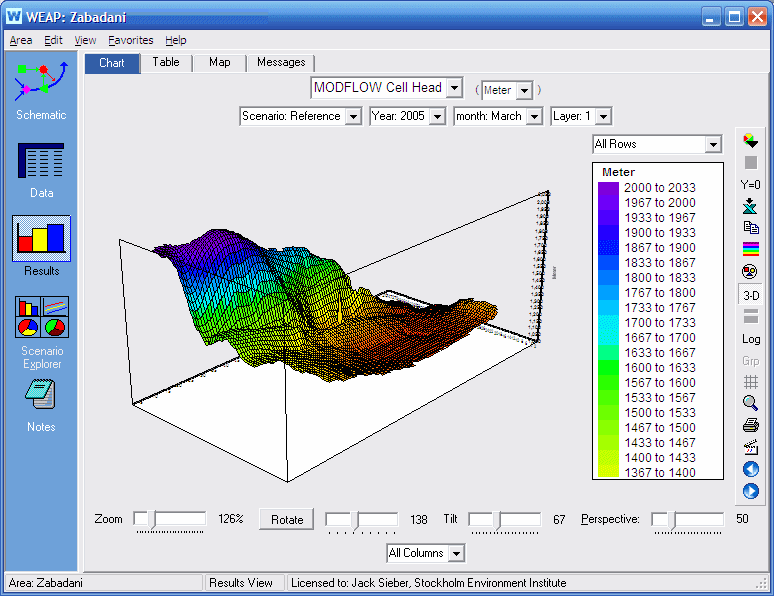
Cell Head and other MODFLOW results can be overlaid on the map, or displayed as a 3-dimensional surface. In the Results View, choose the variable Supply and Resources \ Groundwater \ MODFLOW \ Cell Head. On the chart tab, this will display by default as a 3-D surface showing head elevations for one layer, timestep, and scenario, with cells color coded by elevation. Using the mouse, click and drag on the surface to rotate it, rotate the mouse wheel to zoom in and out, or move the sliders below to manipulate it. Click the "Rotate" button to start it spinning. As the mouse moves over each cell, the status line at the bottom of the WEAP window will display the row, column and head value for that cell.
To advance through time, click the blue arrows (in the toolbar to the right of the legend) to go forward or backward by a timestep, or click the animation icon just above the blue arrows to have it step through every timestep.
Click the Map tab to see cell head results displayed on the Schematic, again for one layer, timestep and scenario. Below the map, a chart shows how head results for a single cell vary over time, one line for each scenario. (Turn off the "Y=0" button to the right of this chart to magnify the changes in elevation over time.) Click any cell on the map to see it charted below. (Click and drag on the map and the chart will update as you move the mouse.) Click on any point in the chart to see all the cell heads for that timestep displayed on the map above. (Click and drag on the chart and the map will update as you move the mouse.) Click the blue arrows below the chart to step forward or back one timestep.
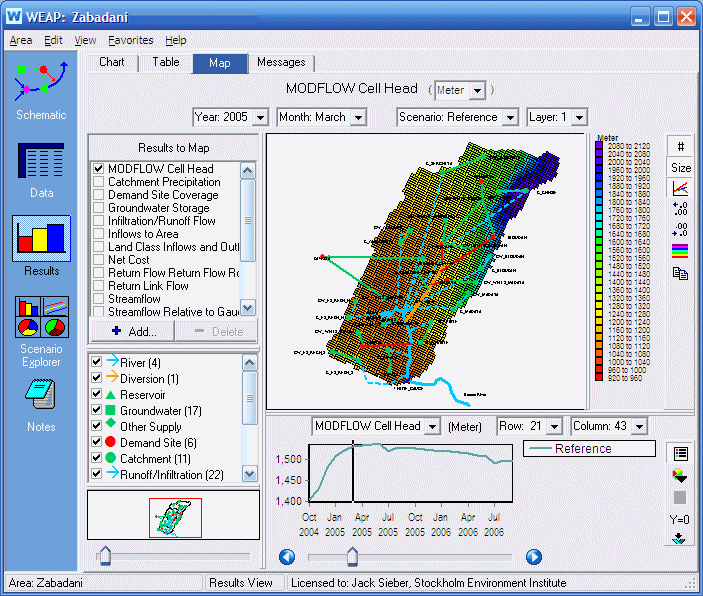
Even though the map only shows results for one timestep, the elevations associated with each color (e.g., green = 1600-1640 meters) do not change as you view other timesteps. This makes it easy to see how head changes over time.
Attributes (W=Well, R=Recharge, D=Drain, V=River, H=Constant Head, F=Flooded, dry=Dry Cells) for each cell can be displayed; turn on or off using their checkboxes (lower right). Note: Pumping that is represented as negative recharge appears as a Well cell (W). A flooded cell is one in which the water table elevation (head value in the uppermost active cell) exceeds the elevation of the ground surface.
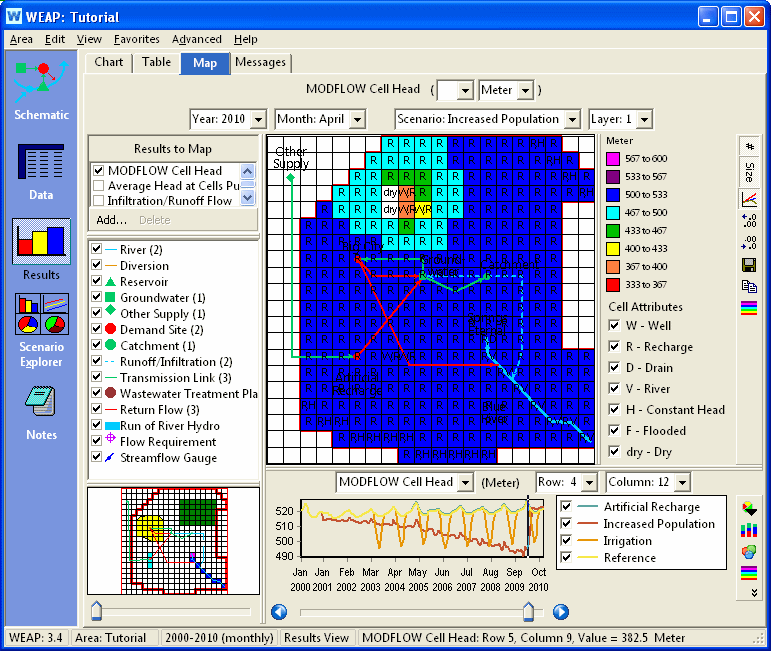
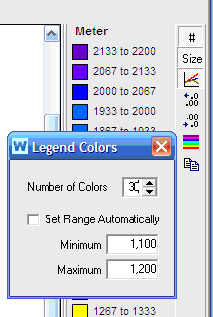
By default, WEAP will automatically choose a rainbow of colors to span the entire range of values. If you would like to focus on a smaller range, you can set the range yourself manually. You may also change the number of colors used. Click the rainbow icon to the right of the chart or map to make changes.
In addition to cell head, you can also look at the following results from MODFLOW: Recharge, Pumping, Leakage to River, Drain Flow, Flow Right Face (flow from the column to the right -- higher column number), Flow Front Face (flow from the row below -- higher row number), Flow Lower Face (flow from layer below -- higher layer number), Constant Head Flow, General Head Flow (GHB), Evapotranspiration (EVT or ETS), Pump Head, Pump Head at Sub-Branches (if linked to Demand Site sub-branches), and Number of Dry Cells. For each of these, you can see either the total volume per cell, or the depth in each cell (volume divided by cell area). For recharge, positive values represent inflow into the cell, whereas for pumping, drain flow and leakage to river, positive values represent outflow from the cell. For models with more than one layer, you can see the groundwater inflows and outflows (for WEAP groundwater nodes) reported by layer, on the "Groundwater Inflows and Outflows by Layer" report. For models with confining layers (and if you have grouped layers into aquifers), you can see the groundwater inflows and outflows (for WEAP groundwater nodes) reported by aquifer, on the "Groundwater Inflows and Outflows by Aquifer" report. If using the seawater intrusion (SWI2) package, you can see the Zeta Surface Elevation as a 3-dimension surface for each active surface. This 3-D surface can be manipulated in the same way as the Cell Head surface, as explained above.
To see how much pumping has been reduced due to dry cells, see the Pumping Reduction by Demand Site or Pumping Reduction by Groundwater Node reports. When using MODFLOW-NWT and the UPW (Upstream Weighting) package, MODFLOW will reduce the amount that can be pumped from a cell as the cell's head approaches the bottom of the cell. If the setting (in General, Basic Parameters) for "MODFLOW Pumping if Dry or Inactive Cells" is "Do not reapportion pumping from dry or inactive cells," WEAP will reduce groundwater pumping by demand sites and catchments from these drying cells accordingly. This will result in Unmet Demands, and will be included in the MODFLOW "Pumping Reduction" reports.
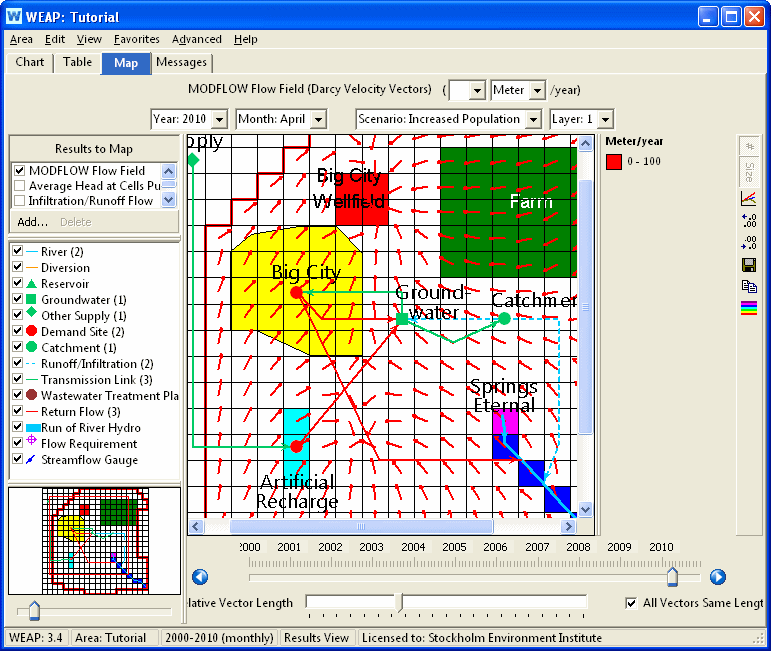
The groundwater Flow Field can be shown as 3-D vectors, one per MODFLOW cell starting at the cell's centroid, with the color and length of each vector reflecting the magnitude of the Darcy velocity. The net velocity is the sum of the flow across all six faces of each cell. The velocity unit is length / year; change the length unit at the top. Adjust the relative vector length using the slider below the graph, or choose to have all the vectors be the same length (to the right of the slider). If you prefer that all vectors use the same color, click the rainbow icon (on the toolbar on the right) and set number of colors to one, or to change the color palette.
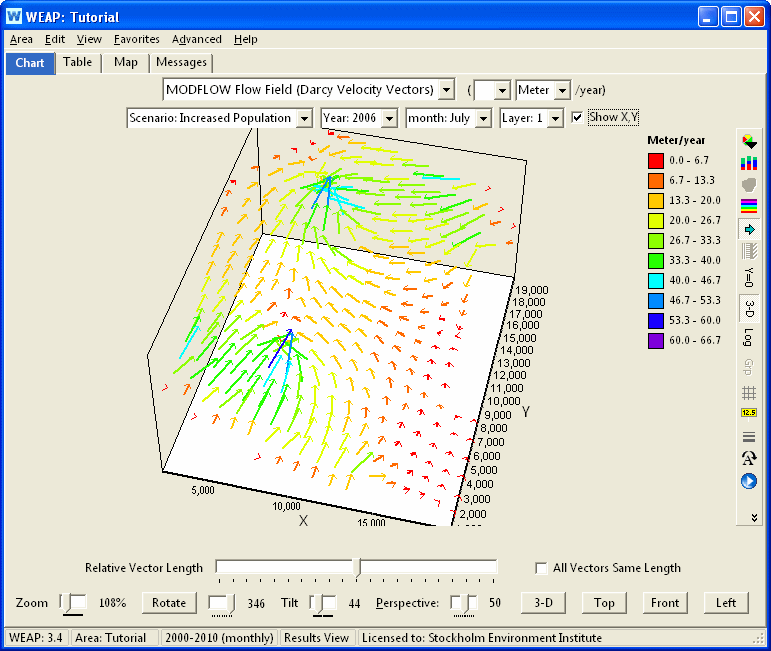
Click the Map tab to see the flow field vectors displayed on the Schematic, for one layer, timestep and scenario.
You can access MODFLOW results for individual cells in WEAP expressions using the PrevTSValue function. For example, PrevTSValue(Cell Head[1,57,30]). See PrevTSValue for more information.